Posts

Adding Proxmox to the equation

 I ended up going down the Proxmox rabbit hole. Reading about it, I could see that a homelab is part of a larger picture in the home automation experience. Running Home Assistant on a Pi felt fragile after awhile, as I added more and more functionality to it. I wanted more processing power than on my older Synology NAS. VMs and LXCs would add more solutions to solving perceived problems. Actually Getting Started  I picked up a Beelink EQ14 for $200 on Amazon, added a 2TB nvme as extra storage for another $100. The first couple of things were easy wins, after setting up Proxmox - retiring two RPis (Home Assistant & Pi-Hole). Back up home assistant, spin up a HA instance using a script, a minor edit to allow USB passthrough for the Zigbee/Z-wave dongle - it was really easy. I re-used the old IP address as well. A quick LXC for Pi-Hole, also easy. Connecting Storage for Backups  Attaching storage from the NAS was slightly more complex, but NFS was not too hard. SMB didn'...
Temp-Humidity Sensor on the Cheap - DHT22, ESPHOME, Wemos D-1 Mini

Image
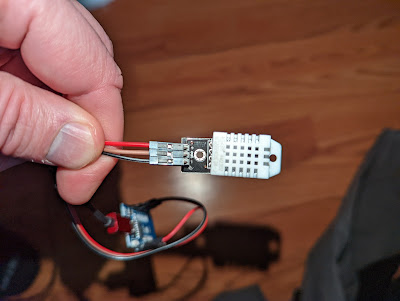
I picked up some DHT22 and Wemos D-1 Minis for a bathroom-vent project - if it gets too humid from the shower, turn on the fans. When the humidity drops, turn off the fans. This is the story on how they were actually used. A kitten-based project. Frida developed dry coughs this past week. Environmentally, nothing had changed. Food was normal, litter box normal, no chaos. We took her to the vet - no lungworm, no asthma, no cancer in the xrays. Maybe the house is just too dry? Step One: Find the components DHT-22 Sensors - I bought some "HiLetgo 2pcs DHT22/AM2302 Digital Temperature And Humidity Sensor Module" from Amazon. These have three connections: power, sensor, and ground. Some other DHT-22's have 4...one apparently is just not connected. The AM2302's have an advantage later as we will discover, but will an extra line of code. Came with appropriate female-female wires. Wemos D-1 Mini: I found 5 for $16 on Amazon. Not the actual Wemos brand, but they worked. They c...

TryFi integration with helpers, scripts, and automations

Image
This article is being written on August 29, 2022 using Home Assistant 2022.8.7, HACS 1.27.1, and TryFi 0.0.17.  First and foremost: TryFi integration devs - thanks for your hard work! This is also not strictly a "home" automation, although all of the data and actions are being handled on Home Assistant. This home project is tied to my dog's Fi collar - I am not receiving payment of any kind from Barking Labs/TryFi nor am I claiming any kind of license/trademark over anything mentioned here. There are two projects - a basic notification automation if Astrid hasn't met her step goals for the day by a certain time, and a more complex automation mimicking a "Safe Zone" in TryFi terms, or something similar to a "Zone" in Home Assistant. What the Projects Need Nabu Casa, or some method to reach your Home Assistant instance remotely. HACS (to install TryFi) TryFi integration (through HACS) Your Fi login & password, and an active Fi collar subscription...

Zones and Automation

Image
Project Overview Turn on door alarm alerts to the phone when not at home, and turn off door alarm alerts when at home. Receiving alerts outside of the home assistant's network requires some kind of remote access for your phone app. Nabu Casa is an easy and secure way, but there are other methods. The Panel This is from a dashboard. "Door Alarm Notify Only" is an input boolean. When this is on, doors being opened will trigger an automation to message users whenever a door sensor turns on. When it is off, no messages are generated. This is called Door Alarm Notify Only, as opposed to when the security alarm is engaged. (Code was removed from this blogger post.) "Smoke Alarm Notify Only" [clear] is not part of the automation. (When it is not clear, it uses an automation to send a notification.) "Door Ajar Notify" is an input boolean. When on, if a door sensor is open for more than 15 seconds, it generates an alert. (This is always on, but if it is generat...

Troubleshooting a broken Octoprint Integration

Image
A situation came up - my Octoprint/printer page wasn't working like it should. Power could turn on and off - not a problem Sensors would show temperatures and status - not a problem Buttons that sent commands back to Octoprint no longer work - PROBLEM The electrical power for each printer is managed by a TP Powerlink, each plug is managed by a different entity. It does not use Node-Red, and buttons for the power worked for both printers. This was not helpful. The Octoprint integration shouldn't be touching the button flows. The sensors were live, so the HA integration was probably not the case. This is using Home Assistant Core 2022.5.3. With a recent release, the developers changed things up. For example, to check your configuration.yaml and restart your server - previously it was found at Settings>System. (As a caution, the "help" text for that option still indicates the reboot is found there.) Instead, it is found under Developer Tools>YAML - both the confi...

More Octoprint Integration Issues

Image
Sadly, I didn't take screenshots of the immediate issue. But fortunately the solution is simple once you find it.   Temperature Problems Temperature numbers from printer bed AND printer nozzle, for both printers were no longer registering any data. (Instead, they read -18 degrees, which is what the Farenheit-to-Celsius template sensor returns when it doesn't have any data.) It had been working several weeks ago, the last time I printed. It could have been a Home Assistant or Octoprint update, or some kind of data corruption. Regardless of the cause, it needed to be fixed. Start in Configuration Go to Configuration>Integrations>(Choose a printer)>(Select the entities).  In my screenshot, you'll notice 7 exclamation marks in red circles. This is normal, as the printer is not connected - it doesn't have any temperatures to report or printer states. When I was working on the problem, the 4 temperature rows - instead of an exclamation mark in a circle - there were e...

Fixing Octoprint Integration in Home Assistant

So, Home Assistant has an integration for Octoprint. Seems like it would be really solid - a great thing! Well, it is, unless you already have two printers set up in Home Assistant. I considered tearing it all out and rebuilding it. Delete it, and see what it comes back as. That probably would have been more sane. If you go this route, skip to Octoprint side fixes. Identify what needs to get changed The first step was that none of my sensors were correct. Fortunately, my input booleans (buttons for turning things on and off, retracting - those all go through MQTT topics in Node Red and were untouched.) Octoprint side fixes First, I went to two Octoprints and their Home Assistant Discovery plug-ins and changed the device name to be unique. (The names of the two printers showed up as "Octoprint", resulting in "Octoprint****_2" for some of the entities.) Next, you do NOT need to change anything in MQTT. These are untouched. Back in Home Assistant In the configuration.y...

Fixing Fahrenheit-to-Celsius as a one-off conversion template

As someone living in the United States, we use Fahrenheit for temperatures and imperial measurements for measuring things. (Including measuring ingredients by weight or volume, depending!) Which is why my HA uses Fahrenheit/imperial. But in 3D printing, I use Celsius. Sometime in August/September 2021, Home Assistant broke part of my process. It could be that my customization.yaml file's "C" designation broke, or that Home Assistant figured out what was going on and decided to "help" me by converting Celsius from the printer into Fahrenheit. Doesn't matter - end result: my Octoprint sensors were reporting Fahrenheit temps instead of my desired Celsius. First step: Create conversion template entities I added this to my configuration.yaml file: sensor:   - platform: template     sensors:       octoprint_micro_actual_bed_temp_c:         friendly_name: "Micro Bed (°C)"         ...

Setting up an alarm system using Z-Wave door sensors and Sonos speakers

Image
Setting up an alarm system is fairly intrinsic to a lot of Home Assistant implementations. If you're looking at ADT, Simplisafe...other options, you get their system and their controls - and you pay a monthly subscription for the good stuff. Home ownership, you get a discount on your home insurance if you have a security system that hits a third-party reporting service. Home Assistant doesn't get you there until you add something like Noonlight. Noonlight will be a future addition - this is already a long process. Materials: Door Sensors (I used Ecolink Zwave Plus [DWZWAVE2.5-ECO], $30 for each set of sensors - so $60 for front/back door) A Z-Wave USB for Home Assistant (I used Nortek HUSBZB-1, $50) Speakers (I used some early-model Sonos speakers) Probably a tablet to act as a disarm/arm location (I used Amazon Fire 7 (2019) $50 on Amazon) - you can also use any phone with the HA app, or any computer. Steps to get it working: Get your door sensors connected to your Z-Wave coor...

IoT button for Home Assistant - IKEA Tradfri

Image
The project: "I need a button for the bedroom, so I can get your attention when you're downstairs." I looked for a button that was inexpensive and could link up to my existing home assistant setup. Sadly, it took awhile to get a Tradfri - they were frequently low or out of stock at the IKEA 60 minutes away. I eventually just mail-ordered two when they got in stock. Nice size. Good weight. Uses Zigbee. Did not come with real instructions (probably supposed to install the app). Zigbee pairing modes for Home assistant and IKEA Tradfri Configuration > Integrations > HubZ Smart Home Controller (add it if you don't) > Configure. To have Home Assistant go into pairing mode, click on "ADD DEVICE" in the lower-right corner.  Eventually I figured out you needed to click the button next to the battery 5 times in succession to be in discovery mode. A small red LED will blink through the front case when it starts trying to pair. First Roadblock I use a Nortek HU...

Motion Detection with Amcrest Part 2: Sending a Photo through Automation

Image
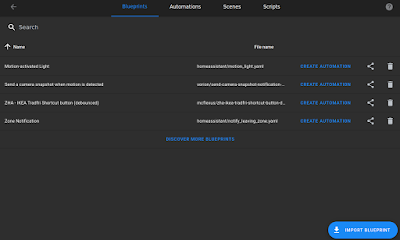
 I managed to set up motion detection previously. Currently, there's a live feed of the camera on Home Assistant, as well as my Synology NAS. My NAS also saves 10 seconds around the motion event trigger - if I get a home assistant motion detection alert on my phone (or on my watch through my phone), I can boot up a connection on my NAS, browse over to security feed, look at the timeline...but that's time. If I'm asleep in bed, it's kind of crazy to boot up your computer just for that. There were different solutions for this - the Amcrest app or Home Assistant solutions through Node Red and/or automations. I want to keep solutions in-house as much as possible, so that left Node Red and automations. You will need to have the home assistant app installed on your phone. I hit a roadblock fairly early and often...how do I identify the picture taken, where is it stored, and how to send it. This solution came up as I was looking at blueprints for something else. Honestly, it w...

Motion Detection with Amcrest

Image
The setup of the basic Amcrest Wifi camera does require a non-HA interface to initially set up. In my case, I used their app on my Android phone. My experience was straightforward - Add a Device, walk through their steps. Done. Adding it to Home Assistant was more interesting. This is added to your base configuration file   If you've read my previous entries, using the !secret can be skipped if you just want to leave the host IP, username, and password in your configuration file. If you don't care about motion sensor triggers, you can skip those last two lines. Once you restart Home Assistant, BackdoorAmcrest will be visible as an entity. What I wanted though - if there's something triggering the motion sensor...I don't just want to record it for later, I want to know about it. So I go to Node Red. Two parts: the trigger & the notification You'll notice "motion-detected" is a binary sensor, which means true/false. If you had set up the motion-detected ...

Adding a Nortek Z-Wave/Zigbee USB dongle

Image
Purchased online for $50, the Nortek Z-Wave/Zigbee USB dongle seems like the easy way to add Z-Wave and Zigbee functionality to Home Assistant.  What is Z-Wave? It uses radio wave frequencies to connect to each other, in the 800-900 MHz range. This means it's not going to interfere/be interfered with, from your wi-fi network (running either on 2.4 or 5GHz). The Z-Wave devices can (but not all do) repeat signals, creating a Z-Wave mesh. It's limited to 232 devices, which is plenty for my purposes, but allegedly opening up to more as time goes on. What is Zigbee? It is similar, but uses the 2.4GHz range. Zigbee devices can also create a mesh, but due to a multitude of different implementations, one Zigbee device may not link to another brand's Zigbee device. Zigbee send messages faster, and can have 65,000 devices on the network...which seems like overkill. To Choose, or Not to Choose Rather than pick one, and be limited to one type of device - the USB dongle seems like a fai...

Adding in a Kasa Smart KP-303 3-plug power strip (Smart Plugs)

Image
I have a couple of 3D printers in a small crafting room - I've automated control of the printers through Home Assistant, but still needed to go into the craft room to turn on the printers. I found a smart power strip on Amazon for $27, where I can plug in my two Raspberry Pi 2B+'s into the two USB connections (always on). The three grounded outlets each have a button or you can control it through the Kasa app/Home Assistant. Kasa App angle I did not see a way to avoid installing the Kasa app...you need it to assign the network/password to your power strip. The Kasa app lets you control the power strip remotely, but I will continue to look for a way to strip the app out of the loop. (Once I have it working with Home Assistant, I don't want Kasa to remove it with an update.) The Kasa App itself was easy to install. It does ask you if you want to enable for Google Assistant/Amazon Alexa/Samsung SmartThings - but you can skip that. Once you add the device, in the Devices menu, ...

Making Things Pretty in Home Assistant without HACS

Image
[Nov. 3, 2021 edit: if you like Celsius for your printer feed, but use Imperial as your base measurement on HA, something broke the below process. I wrote a new post , adding some conversion templates to restore this feature. We now return you to the article...] So my title is a little misleading. If you want the dark-grey theme, and the little icons in the third set of rows...you need HACS. But otherwise it's just stock-HA white, which is totally fine.  Reading Home Assistant forums, browsing youtube videos - you hear the glory of HACS (Home Assistant Community Store). Home Assistant is free & open-source, done by volunteers, same with HACS. HACS comes with a disclaimer: it's risky. Don't use it unless you know a bit about Home Assistant. And then there's some common-sense directions on how to install it. I pulled myself in, because I wanted themes and Font Awesome icons. I really don't want to tackle adding HACS or fontawesome as a tutorial - HACS was easy e...