Motion Detection with Amcrest Part 2: Sending a Photo through Automation
I managed to set up motion detection previously.
Currently, there's a live feed of the camera on Home Assistant, as well as my Synology NAS. My NAS also saves 10 seconds around the motion event trigger - if I get a home assistant motion detection alert on my phone (or on my watch through my phone), I can boot up a connection on my NAS, browse over to security feed, look at the timeline...but that's time. If I'm asleep in bed, it's kind of crazy to boot up your computer just for that.
There were different solutions for this - the Amcrest app or Home Assistant solutions through Node Red and/or automations. I want to keep solutions in-house as much as possible, so that left Node Red and automations. You will need to have the home assistant app installed on your phone.
I hit a roadblock fairly early and often...how do I identify the picture taken, where is it stored, and how to send it. This solution came up as I was looking at blueprints for something else. Honestly, it was a hard stop.
Blueprints are a relatively new feature for Home Assistant in 2021. They are formatted scripts for generating custom automations. There are a lot of junk blueprints in the HA community, but I'll share the snapshot one that I found useful: https://community.home-assistant.io/t/send-camera-snapshot-notification-on-motion/254565
Finding and Importing a Blueprint
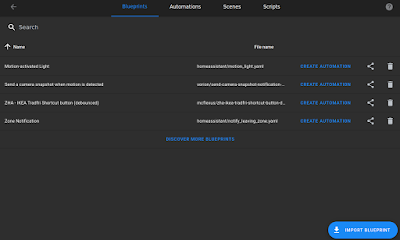
To get started with this blueprint, go to your Configuration tab and select Blueprints.
If you haven't added blueprints before, there are a couple of stock ones included in HA - Motion-activated light & Zone Notification. (These have a file name of "homeassistant/*filename*.yaml") You can discover more through the "DISCOVER MORE BLUEPRINTS" below your existing blueprints, and import them into your system by using the "IMPORT BLUEPRINT" button in the lower-right corner. All you need is the URL from the blueprint you want to try out.
Using a Blueprint
From that point, it's fairly easy to actually use the blueprint. Clicking on the "Create Automation" next to the appropriate blueprint in home assistant takes you to the fields the automation needs.
 |
| The blank blueprint |
Drop-downs allow you to find existing entities & devices on your home assistant. There are fields were you can put custom text or timers. Important! I found that I needed a delay of 1 second or more in the "Delay (Optional)" field. At zero seconds, it did not trigger. Once you've saved it, it shows up in your available Automations. (Accessible through Configuration>Automation.)
 |
| A completed automation |
On Android, the alert will come in as a "motion detected" to your phone's notification log. In order to SEE the photo, you have to swipe down from that alert. If you dismiss the alert (swipe right, it goes away.)
Conclusion
It was easy to get it running using blueprints. It still triggers on light changes - either because a light turned on outside, or the shadow moved...I'll have to figure out changing the sensitivity of the camera's settings. (At one point in a recent trip, I had to turn off the notification automation - I had just moved the camera just before leaving and the shadows changed a lot more often. 30+ notifications each morning was a bit much. Do not do last minute testing!)


Comments
Post a Comment